Qt/C++ による GUI ソフト 6:レンダリング その1
Qt 3D とは,Qt/C++ と Qt/Quick の両方で 2D および 3D のレンダリング(カメラの視点からシーンを描画すること)をサポートするライブラリです.
本サイトで開発している分子モデリングソフトウェアのレンダリングエンジンを Qt 3D に変更する目的で勉強しています.
このページでは,Qt 3D の公式ページで公開されているサンプルコードを流用して,Qt 3D レンダリングをおこなう GUI ソフトの雛形を作成します.
Before : 5:イベント処理 Next : 7:レンダリング その2
このページのレンダリングには Qt 3D を使っていますが,これは廃止の方向に進んでいるようです.
GUI に Qt を使うなら,Qt Quick 3D あたりを練習する必要がありそうです.
インフォメーション
目次(ページ内リンク)
- 要約 Qt 3D
- サンプルコードをビルド:Qt3dWindow に球を 1 個作成します
- GUI ソフトの体裁を整える:Qt3dWindow をQWidget に埋め込んで,メインウィンドウに配置します
- シーンの改変(1):レンダリングされる球を 2 個に増やします
インストールした Debian パッケージ
| パッケージ名(バージョン) | 注 |
| g++(14.2.0) | GNU C++ コンパイラ |
| make(4.4.1) | コンパイルを制御するユーティリティ |
| qt6-base-dev(6.8.2) | Qt6 アプリケーションのビルドに使用されるヘッダ開発ファイル |
| qt6-3d-dev(6.8.2) | Qt 3D ライブラリを使用した Qt6 アプリケーションのビルドに使用されるヘッダ開発ファイル |
要約 Qt 3D
全体的な解説が,Qt 3D Overview にあります.サンプルコードは Qt 3D Examples にあります.
これらを読んで得られた雰囲気をまとめてみます.
Qt3DWindow
レンダリングの場となるクラスは,Qt3DExtras::Qt3DWindow といいます.
Qt3DWindow は,QWindow を継承したクラスです.QWindow はウィジェットではありません.「ウィンドウシステムを表現するクラス」だそうです.Qt3DWindow を QWidget に埋め込む方法は 4:3D レンダリングウィジェットの作成で勉強しました.
QEntity と QComponent
Qt3DWindow には,シーン(場面とか光景の意)を作成します.シーンは,レンダリングされるべき物体,カメラやライトなどから構成されます.
シーンを構成するオブジェクトの基底クラスは,Qt3DCore::QEntity Class といいます.QEntity 自体は空の入れ物です.
QEntity の性質(物体の形とか色その他)を設定するクラスもあって,こちらは Qt3DCore::QComponent Class およびその派生クラスです.
QEntity と QComponent の継承関係を遡ってみると,
QEntity,QComponent → Qt3DCore::QNode → QObject
QEntity と QComponent は,QNode や QObject を継承しています.QEntity はリスト構造のノードであり,配置されるオブジェクトを連結してシーンを作成します.
シーンを構成する連結リストの根をルートエンティティといい,Qt3DWindow にはルートエンティティをセットします.
QEntity,QComponent を連結する関数
執筆時点(Qt 6.10.1)では,Qt3dWindow のリファレンスマニュアルを見つけることができないのですが,Qt 3D Examples と Qt 5.11.1 のリファレンスマニュアルには,
void setRootEntity(Qt3DCore::QEntity *root)
というルートエンティティを配置する関数が記載されています.
QEntity を生成する際には,親となるエンティティをコンストラクタ引数として与えます.例えば,
Qt3DCore::QEntity *sphereEntity = new Qt3DCore::QEntity(rootEntity);
QEntity に QComponent を連結するには,QEntity::addComponent() 関数を使います.例えば,
sphereEntity->addComponent(material);
カメラとライト
Qt3DWindow は,Qt3DRender::QCamera というメンバを持っています.
カメラを取得するには Qt3DWindow::camera() という関数を使います.すなわち,
Qt3DRender::QCamera *camera = view.camera();, //Qt 3D Examples のコード.view は Qt3DWindowのインスタンス
ライトは,QEntity に,QPointLight という QComponent 継承クラスを追加して作成します.
要約
- QEntity は,描画されるべきオブジェクトやカメラなどの実体を記述するための基底クラスである
- QComponent は,QEntity の属性(形状,色,位置など)を設定するための基底クラスである
- QEntity は,リスト構造のノード,QComponent は,リスト構造の葉とみなせそう
- シーンを作成する作業は,連結リストを作成する作業である.連結リストの根をルートエンティティという
- Qt3DWindow にはルートエンティティを置く
- QEntity の属性を変更するには,QEntity に QComponent を連結するか,連結済みの QComponent を編集すればよい
サンプルコードをビルド
Qt 3D Examples には 2 個のサンプルコードがあります.
そのひとつ Qt 3D: Simple C++ Example は,トーラスの中で球を移動させるアニメーションのコードです.このコードでは球の大きさと反射モデル,およびカメラの設定を設定していますが,球の色やライトは未設定です.
Qt 3D の理解を深めることを目的として,Qt 3D: Simple C++ Example のコードから抜粋して.描くオブジェクトを球 1 個,アニメーションなし,というシーンにしてみます.作業自体はコードを抜粋しているだけです.
ソースコード
下はそのソースコードです.Qt 3D: Simple C++ Example からの,削除以外の変更点は,Qt3DCore::QEntity *createScene() 関数を閉じたこと,カメラの視錐台のアスペクト比を 1.0 に変更したことです.赤字で示します.
ソースファイルは tmp ディレクトリに作成したとします.
main.cc
ここでは,QEntity のコンポーネントとして,Qt3DRender::QMaterial Class と Qt3DExtras::QSphereMesh Class のインスタンスを追加しています.
#include <QApplication>
#include <Qt3DWindow>
#include <Qt3DCore/QEntity>
#include <Qt3DRender/QCamera>
#include <QOrbitCameraController>
#include <Qt3DExtras/QSphereMesh>
#include <Qt3DExtras/QPhongMaterial>

//シーンを作成してそのルートエンティティを返す関数
Qt3DCore::QEntity *createScene() {
 //ルートエンティティ
 Qt3DCore::QEntity *rootEntity = new Qt3DCore::QEntity;

 //物体の見た目をフォン反射モデルで作成.レンダリング  その2 で,もう少し細かく設定します
 Qt3DRender::QMaterial *material = new Qt3DExtras::QPhongMaterial(rootEntity);

 //ルートエンティティの子ノードとして(空の)エンティティを作成.後でコンポーネントを付け加えて球にする
 Qt3DCore::QEntity *sphereEntity = new Qt3DCore::QEntity(rootEntity);

 //sphereEntity の球面としての性質
 Qt3DExtras::QSphereMesh *sphereMesh = new Qt3DExtras::QSphereMesh;  //形状.QSphereMesh は球面を表現するメッシュ
 sphereMesh->setRadius(3);  //半径
 sphereMesh->setGenerateTangents(true);  //接線を作成する(これはレンダリングの設定.ここで必要かどうか知らない)

 //sphereEntity にコンポーネントとして性質を付け加える
 sphereEntity->addComponent(sphereMesh);
 sphereEntity->addComponent(material);

//オリジナルのコードでは以下は記されていないので,何か大事なことが欠落している不安はある
 return rootEntity;
}

int main(int argc, char* argv[]) {
 QGuiApplication app(argc, argv);
 Qt3DExtras::Qt3DWindow view;

 //上の関数からルートエンティティを取得
 Qt3DCore::QEntity *scene = createScene();

 //カメラの設定
 Qt3DRender::QCamera *camera = view.camera();  //カメラは Qt3DWindow から取得できる
 camera->lens()->setPerspectiveProjection(45.0f, 1.0f, 0.1f, 1000.0f);  //カメラの視錐台
 camera->setPosition(QVector3D(0, 0, 40.0f));  //カメラの位置
 camera->setViewCenter(QVector3D(0, 0, 0));  //カメラの向く方向

 //カメラコントローラ.マウスやキーボードと連動してカメラを移動できる
 Qt3DExtras::QOrbitCameraController *camController = new Qt3DExtras::QOrbitCameraController(scene);
 camController->setLinearSpeed(50.0f);
 camController->setLookSpeed(180.0f);
 camController->setCamera(camera);

 view.setRootEntity(scene);
 view.resize(300, 300);
 view.show();

 return app.exec();
}
tmp.pro
TEMPLATE = app
TARGET = my_window
INCLUDEPATH += .
SOURCES += main.cc
QT += widgets
QT += 3dextras
ビルドと実行
1:メインウィンドウ以来同じ手順です.ソースファイルが tmp というディテクトリにあるとします.
~/tmp$ qmake6
~/tmp$ make
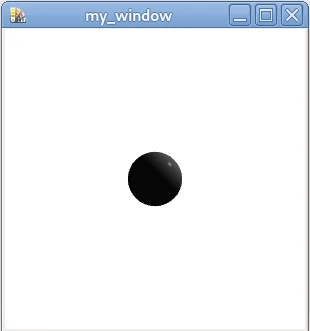
~/tmp$ ./my_window &
黒い球が表示されました.ライトは未設定ですが,球の右上部が光っているように見えます.
カメラコントローラの操作は,リファレンスマニュアル Qt3DExtras::QOrbitCameraController Class に書いてあります.動いたり動かなかったりしたので,もう少し細かいコーディングが必要かもしれません.
- 左マウスボタン:左マウスボタンを押しつつ,マウスを X 軸方向に動かすとカメラが左右に移動し,Y 軸方向に動かすとカメラが上下に移動します(物体はこの逆の動き)
- 右マウスボタン:右マウスボタンを押しつつ,マウスを X 軸方向に動かすとカメラがビューの中心を軸にしてパンし,Y 軸方向に動かすとカメラがビューの中心を軸にしてチルトします
- 左マウスボタンと右マウスボタンの両方:左ボタンと右ボタンの両方を押しつつ,マウスを Y 軸方向に動かすとビューの中心を変えずにカメラをズームインまたはズームアウトします
- マウスホイールのスクロール:ビューの中心を変えずにカメラをズームインまたはズームアウトします
- 矢印キー:カメラビューポートに対してカメラを垂直方向と水平方向に移動します
- Page Up キーと Page Down キー:カメラを前後に移動します
- Shift キー:Page Up キーと Page Down キーの動作を変更して,ビューの中心を変えずにカメラをズームインまたはズームアウトします.その他の移動キーは無効になります
- Alt キー:矢印キーの動作を変更して,ビューの中心を軸にしてカメラをパンおよびチルトします.Page Up キーと Page Down キーを無効にします
- Escape キー:シーン全体がカメラビューポートに表示されるようにカメラが移動します(初期設定のカメラ位置ではない)
GUI ソフトの体裁を整える
上のセクションでは,球 1 個からなるシーンを作成してレンダリングする Qt3DWindow を作成しました.
このセクションでは,そのコードを切り貼りしてウィンドウアプリケーションとしての体裁を整えます.
GUI については,Qt3DWindow を埋め込んだメインウィンドウを作成します.これには,5:イベント処理で作成したウィンドウアプリケーションの雛形を使います.
内部の構造ですが,シーンを作成するクラスを作成します.こうすれば,シーンの書き換えや差し替え(== ルートエンティティの付け替え)が楽になると期待してのことです.
カメラコントローラは使わないことにしました.マウスを使うということが,このサイトで開発している分子モデリングソフトと競合するためです(マウスでカメラを動かすのか分子を動かすのか区別する必要が生じるため).
ソースコード
scene.h
シーンを作成するクラス宣言を新規作成します.上のセクションで作成したコードから,ルートエンティティを持ってきました.
作成したシーンは,get_root_entity() 関数で得られます.
#ifndef ___SCENE
#define ___SCENE

#include <Qt3DCore/QEntity>
#include <Qt3DExtras/QSphereMesh>
#include <Qt3DExtras/QPhongMaterial>

class Scene {
 private:
  Qt3DCore::QEntity *rootEntity;

 public:
  Scene();  //サンプルなので,シーンはコンストラクタで作成してしまいます
  Qt3DCore::QEntity *get_root_entity() { return rootEntity; }
};

#endif
scene.cc
シーンを作成するクラス定義を新規作成します.上のセクションで作成したコードの,球を作成する部分を,コンストラクタにペーストしました.
#include "scene.h"

Scene::Scene()
 : rootEntity(nullptr)
{
 rootEntity = new Qt3DCore::QEntity;

 Qt3DRender::QMaterial *material = new Qt3DExtras::QPhongMaterial(rootEntity);

 Qt3DCore::QEntity *sphereEntity0 = new Qt3DCore::QEntity(rootEntity);

 Qt3DExtras::QSphereMesh *sphereMesh = new Qt3DExtras::QSphereMesh;
 sphereMesh->setRadius(3);
 sphereMesh->setGenerateTangents(true);

 sphereEntity0->addComponent(sphereMesh);
 sphereEntity0->addComponent(material);
}
draw_window.h
5:イベント処理で作成したヘッダそのままです.
#ifndef ___DRAW_WINDOW
#define ___DRAW_WINDOW

#include <Qt3DExtras>
#include <Qt3DRender/QCamera>

class Draw_Window : public Qt3DExtras::Qt3DWindow {
 protected:
  void mousePressEvent(QMouseEvent *event);

 public:
  Draw_Window();
};

#endif
draw_window.cc
コンストラクタにカメラの設定をペーストしました.また,カメラを球に近づけてみました.
#include "draw_window.h"
#include <iostream>

Draw_Window::Draw_Window() {
 //カメラの設定
 Qt3DRender::QCamera *Camera = camera();
 Camera->lens()->setPerspectiveProjection(45.0f, 1.0f, 0.1f, 1000.0f);
 Camera->setPosition(QVector3D(0, 0, 20.0f));  //元のコードより原点(== 球)に近づけてみました
 Camera->setViewCenter(QVector3D(0, 0, 0));
}

void Draw_Window::mousePressEvent(QMouseEvent *event) {
 std::cout << __PRETTY_FUNCTION__ << std::endl;

 std::cout << "type ; " << event->type() << std::endl;

 Qt::MouseButton button = event->button();
 std::cout << "button ; " << button << std::endl;

 QPointF point = event->position();
 std::cout << "point ; " << point.rx() << ' ' << point.ry() << std::endl;
}
main_window.h
Draw_Window と Scene のインスタンスはこのクラスに置くことにします.
#include "scene.h"
#include "draw_window.h"
#include <QMainWindow>
#include <QMenuBar>

class Main_Window : public QMainWindow {
 private:
  QMenuBar *menu_bar;
  QMenu *file_menu;
  QMenu *view_menu;  QAction *action_quit;

  Draw_Window *DrawWindow;
  Scene Scene0;

 public:
  Main_Window(QWidget *parent = nullptr, Qt::WindowFlags f = Qt::WindowFlags());
};
main_window.cc
コンストラクタ内で,Draw_Window に Scene のルートエンティティを設定しています.
#include "main_window.h"
#include "draw_window.h"
#include <QHBoxLayout>

Main_Window::Main_Window(QWidget *parent, Qt::WindowFlags f)
 : QMainWindow(parent, f),
   menu_bar(menuBar())
{
 resize(300, 300);

 file_menu = new QMenu("ファイル(&F)", this);
 menu_bar->addMenu(file_menu);

 action_quit = new QAction("終了(&Q)", this);
 file_menu->addAction(action_quit);

 connect(action_quit, SIGNAL(triggered()), this, SLOT(close()));

 QWidget *central_widget = new QWidget(this);
 setCentralWidget(central_widget);
 QHBoxLayout *central_layout = new QHBoxLayout(central_widget);

 DrawWindow = new Draw_Window;
 QWidget *widget = QWidget::createWindowContainer(DrawWindow);
 central_layout->addWidget(widget);

 //DrawWindow に Scene0 のルートエンティティを設定
 Qt3DCore::QEntity *root = Scene0.get_root_entity();
 DrawWindow->setRootEntity(root);
}
main.cc
#include "scene.h"
#include "main_window.h"
#include <QApplication>

int main(int argc, char *argv[]) {
 QApplication app(argc, argv);

 Main_Window window(nullptr, Qt::Window);
 window.show();

 return app.exec();
}
tmp.pro
TEMPLATE = app
TARGET = my_window
INCLUDEPATH += .
QT += widgets
QT += 3dextras
SOURCES += main.cc main_window.cc draw_window.cc scene.cc
HEADERS += main_window.h draw_window.h scene.h
ビルドと実行
手順は上と同じです.
~/tmp$ qmake6
~/tmp$ make
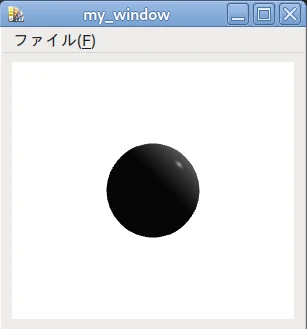
~/tmp$ ./my_window &
画像のように,メニューバー付きウィンドウに球を描くことができました.
元のコードより,カメラを球に近づけたので,球が大きくなりました.
また,マウスハンドラも機能することを確認しました(描画領域をクリックしたら,位置等が端末に出力された).
シーンの改変(1)
球を増やす
ライティングやピッキングのことを考えて,2 個の球を一部重なり合った状態で描いておきます.
ソースコード
scene.cc のみ書き換えました.あとは同上です. 球を生成している部分を,名前を変更してペーストして,位置を設定しました(すればいいだけです).
scene.cc
位置を設定するのに,QTransform Class を使います.
#include "scene.h"
#include <QTransform>

Scene::Scene()
 : rootEntity(nullptr)
{
 rootEntity = new Qt3DCore::QEntity;

 Qt3DRender::QMaterial *material = new Qt3DExtras::QPhongMaterial(rootEntity);

 Qt3DCore::QEntity *sphereEntity0 = new Qt3DCore::QEntity(rootEntity);

 Qt3DExtras::QSphereMesh *sphereMesh = new Qt3DExtras::QSphereMesh;
 sphereMesh->setRadius(3);
 sphereMesh->setGenerateTangents(true);

 sphereEntity0->addComponent(sphereMesh);
 sphereEntity0->addComponent(material);

 //球をもう 1 個作成する.今度は位置を設定する
 Qt3DCore::QEntity *sphereEntity1 = new Qt3DCore::QEntity(rootEntity);

 Qt3DCore::QTransform *pos1 = new Qt3DCore::QTransform(sphereEntity1);
 pos1->setTranslation(QVector3D(2.0f, 2.0f, 2.0f));
 pos1->translation();

 sphereEntity1->addComponent(sphereMesh);
 sphereEntity1->addComponent(material);
 sphereEntity1->addComponent(pos1);
}
ビルドと実行

手順は上と同じです.
画像のように,球が 2 個に増えました.
7:レンダリング その2に続きます.